阿里云SSL证书在Jetty服务器上部署的教程
Jetty服务器也支持安装SSL证书,本文主要为大家详细介绍SSL证书在Jetty服务器上部署的教程。在安装之前,大家首先要申请一张SSL证书,安信证书提供多品牌多类型的SSL证书申请及安装的服务。
1、Jetty服务器版本确认。建议使用Jetty 9.2.22及以上版本。
2、下载tomcat格式的SSL证书。非系统生成的CSR需要生成pfx证书密匙对文件,转换命令如下。
openssl pkcs12 -export -out 214362464370691.pfx -inkey 214362464370691.key -in 214362464370691.pem
3、转换pfx的证书密匙对文件为jks格式,转换命令如下:
keytool -importkeystore -srckeystore 密匙对文件.pfx -destkeystore 证书名称.jks -srcstoretype PKCS12 -deststoretype JKS
回车后输入两次要设置的jks格式证书密码,然后输入一次pfx证书密码。三次密码必须输入pfx-password.txt记录的密码。jks密码与pfx证书密码相同,否则可能会导致Jetty服务器启动失败。


注:Windows环境注意在%JAVA_HOME%/jdk/bin目录中执行。
4、配置Jetty的SSL。
1)确保Jetty的http页面可正常访问。
2)拷贝证书。进入Jetty服务器目录下的etc,新建存放jks格式证书的目录,并复制jks格式证书至当前目录。
# pwd
/opt/jetty9222/etc
# mkdir cert
# cd cert/
# cp ../../../keys/jetty.jks .
# ls
jetty.jks

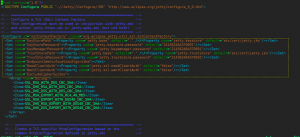
3)编辑Jetty服务器目录中的etc中的jetty-ssl.xml文件,设置证书相关参数(密码设置均为pfx-password.txt所记录的密码)。
<?xml version=”1.0″?>
<!DOCTYPE Configure PUBLIC “-//Jetty//Configure//EN” “http://www.eclipse.org/jetty/configure_9_0.dtd”>
<!– ============================================================= –>
<!– Configure a TLS (SSL) Context Factory –>
<!– This configuration must be used in conjunction with jetty.xml –>
<!– and either jetty-https.xml or jetty-spdy.xml (but not both) –>
<!– ============================================================= –>
<Configure id=”sslContextFactory” class=”org.eclipse.jetty.util.ssl.SslContextFactory”>
<Set name=”KeyStorePath”><Property name=”jetty.base” default=”.” />/<Property name=”jetty.keystore” default=”etc/cert/jetty.jks”/></Set>
<Set name=”KeyStorePassword”><Property name=”jetty.keystore.password” default=”214362464370691″/></Set>
<Set name=”KeyManagerPassword”><Property name=”jetty.keymanager.password” default=”214362464370691″/></Set>
<Set name=”TrustStorePath”><Property name=”jetty.base” default=”.” />/<Property name=”jetty.truststore” default=”etc/cert/jetty.jks”/></Set>
<Set name=”TrustStorePassword”><Property name=”jetty.truststore.password” default=”214362464370691″/></Set>
<Set name=”EndpointIdentificationAlgorithm”></Set>
<Set name=”NeedClientAuth”><Property name=”jetty.ssl.needClientAuth” default=”false”/></Set>
<Set name=”WantClientAuth”><Property name=”jetty.ssl.wantClientAuth” default=”false”/></Set>
<Set name=”ExcludeCipherSuites”>
<Array type=”String”>
<Item>SSL_RSA_WITH_DES_CBC_SHA</Item>
<Item>SSL_DHE_RSA_WITH_DES_CBC_SHA</Item>
<Item>SSL_DHE_DSS_WITH_DES_CBC_SHA</Item>
<Item>SSL_RSA_EXPORT_WITH_RC4_40_MD5</Item>
<Item>SSL_RSA_EXPORT_WITH_DES40_CBC_SHA</Item>
<Item>SSL_DHE_RSA_EXPORT_WITH_DES40_CBC_SHA</Item>
<Item>SSL_DHE_DSS_EXPORT_WITH_DES40_CBC_SHA</Item>
</Array>
</Set>
<!– =========================================================== –>
<!– Create a TLS specific HttpConfiguration based on the –>
<!– common HttpConfiguration defined in jetty.xml –>
<!– Add a SecureRequestCustomizer to extract certificate and –>
<!– session information –>
<!– =========================================================== –>
<New id=”sslHttpConfig” class=”org.eclipse.jetty.server.HttpConfiguration”>
<Arg><Ref refid=”httpConfig”/></Arg>
<Call name=”addCustomizer”>
<Arg><New class=”org.eclipse.jetty.server.SecureRequestCustomizer”/></Arg>
</Call>
</New>
</Configure>
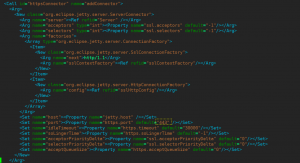
4)编辑Jetty服务器目录中的etc中的jetty-https.xml文件,配置https所使用的443端口。
<?xml version=”1.0″?>
<!DOCTYPE Configure PUBLIC “-//Jetty//Configure//EN” “http://www.eclipse.org/jetty/configure_9_0.dtd”>
<!– ============================================================= –>
<!– Configure a HTTPS connector. –>
<!– This configuration must be used in conjunction with jetty.xml –>
<!– and jetty-ssl.xml. –>
<!– ============================================================= –>
<Configure id=”Server” class=”org.eclipse.jetty.server.Server”>
<!– =========================================================== –>
<!– Add a HTTPS Connector. –>
<!– Configure an o.e.j.server.ServerConnector with connection –>
<!– factories for TLS (aka SSL) and HTTP to provide HTTPS. –>
<!– All accepted TLS connections are wired to a HTTP connection.–>
<!– –>
<!– Consult the javadoc of o.e.j.server.ServerConnector, –>
<!– o.e.j.server.SslConnectionFactory and –>
<!– o.e.j.server.HttpConnectionFactory for all configuration –>
<!– that may be set here. –>
<!– =========================================================== –>
<Call id=”httpsConnector” name=”addConnector”>
<Arg>
<New class=”org.eclipse.jetty.server.ServerConnector”>
<Arg name=”server”><Ref refid=”Server” /></Arg>
<Arg name=”acceptors” type=”int”><Property name=”ssl.acceptors” default=”-1″/></Arg>
<Arg name=”selectors” type=”int”><Property name=”ssl.selectors” default=”-1″/></Arg>
<Arg name=”factories”>
<Array type=”org.eclipse.jetty.server.ConnectionFactory”>
<Item>
<New class=”org.eclipse.jetty.server.SslConnectionFactory”>
<Arg name=”next”>http/1.1</Arg>
<Arg name=”sslContextFactory”><Ref refid=”sslContextFactory”/></Arg>
</New>
</Item>
<Item>
<New class=”org.eclipse.jetty.server.HttpConnectionFactory”>
<Arg name=”config”><Ref refid=”sslHttpConfig”/></Arg>
</New>
</Item>
</Array>
</Arg>
<Set name=”host”><Property name=”jetty.host” /></Set>
<Set name=”port”><Property name=”https.port” default=”443″ /></Set>
<Set name=”idleTimeout”><Property name=”https.timeout” default=”30000″/></Set>
<Set name=”soLingerTime”><Property name=”https.soLingerTime” default=”-1″/></Set>
<Set name=”acceptorPriorityDelta”><Property name=”ssl.acceptorPriorityDelta” default=”0″/></Set>
<Set name=”selectorPriorityDelta”><Property name=”ssl.selectorPriorityDelta” default=”0″/></Set>
<Set name=”acceptQueueSize”><Property name=”https.acceptQueueSize” default=”0″/></Set>
</New>
</Arg>
</Call>
</Configure>
5)编辑Jetty服务器目录中的start.ini文件,按需求更改端口号,并设置启动加载
jetty-https.xml,jetty-ssl.xml。
jetty.port=80
jetty.dump.stop=
etc/jetty-ssl.xml
etc/jetty-https.xml
6)重启Jetty,验证https访问是否正常。

